W6-Copywriting
WEEK 6
PRACTICAL
COPYWRITING


The second page of copywriting is the background details that includes education, skills and expertise as well as contact. They can be put inside the about me page and also the contact page in the website. If people wants to work with the designer, they have to know their education levels, skills and expertise to see whether the designer suits for their company or not. Then, if they want to engage or contact with me, then the contact page is the only way that they will go for.

The last copywriting is the featured work of myself. It includes the Loki's information graphics, Avalanche information graphcis, Lamborghini social media post and the FutureTech rebranding projects. Most of them are for advertising projects which can attract the company or firms that are looking for advertising designers as well as display the skills in designs.
LECTURE
WIREFRAMES
Theto topic mentioned in the lesson was "Wireframes" that helps the design process for website. Which the wireframes helps to structure out the elements of the pages and can make changes easily with the structure first, not the design as well as shows the navigation of the website.
It's enables for the students to improve their website structure based on their functionality. Lecturer also mentioned that it's better to do wireframes first to show the clients in order to let us understand or choose the structure then only go to design. Because of the clients might be rejecting based on the design when the students starts putting the colours or design inside the wireframes.
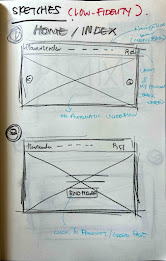
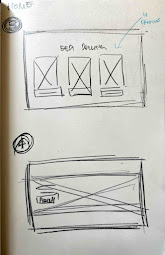
WIREFRAMES SKETCHES & FLOWCHART

The first step of doing wireframes is to create a flowchart in order to know which categories to put. Flowchart shows the flow of the navigation that takes a important part in designing website. After create the flowchart, then have to draw out sketches and the ideas and plan for execute the design. The sketches assists the students to know the best layout of the website. Because it's a sketches of the based structure for the website as well as it's a brainstorming session that allows the students to explore more and decide which one to proceed to develop more.
USERFLOW & WIREFRAME SIZE & BEGIN OF DESIGNING WEBSITE

Lecturer had mentioned that website is like a shop, where we do sales, we communicate through website like we are talking to them, we want people to shop to see on our website. Moreover, he also said that if the website looks expensive, audiences might don't want, due to the high quality. Same as how people shopping online, when they saw something expensive they will consider not to buy it. For the wireframe size, it has to be vary because of the differences display screen size for different devices, therefore the design has to be flexible. After determined all the goals and elements, then begin to put the user flow as like the flowchart inside the wireframes.
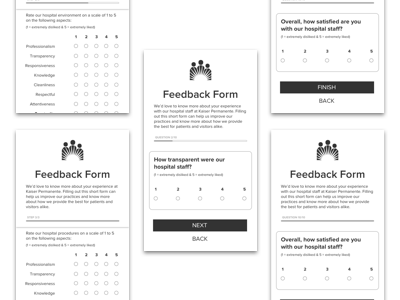
CONVERSION POINTS & FEEDBACK ON WIREFRAME
The lecturer emphasizes the importance of determining user flow through each step, selecting appropriate buttons, links, and page elements, and selecting accurate references based on related fields. Students should also understand copywriting and test wireframes before finalizing designs. Feedback from friends and peers can help make improvements or improvements.
 |
| Conversion Point |
 |
| Feedback |


Comments
Post a Comment